
Thursday, July 28, 2011
CRICUT!!
Okay, I admit it... I was not a Cricut fan. I have a Silhouette and I LOVE it! But, Close to My Heart came out with a Cricut cartridge that will be available August 1st to everyone - so, I HAD to get one. I still LOVE my Silhouette!! You can cut any font!! - you cannot do that with the Cricut AND I have 11,000+ or - a few different patterns for my Silhouette... so, it will take A LOT for this new machine to take that away.... but, this is fun and SOOOOO easy. I just got my new Expression machine (off E-bay - where I did not pay full retail price! Yeah!) and I have the new Art Philosophy Cartridge from CTMH so I am playing today... so far I have figured out how to cut out a card... it is on the pic with the cartridge box and the new machine. I do like the ability to cut 12" X 24" that is nice, but not sure I will use it all that often - can see a few times - like for neat borders and edges, but...
 So, today I spend time playing.... and for you all here is a preview link to the new cartridge.... it is a U-Tube Video..... be jealous, it is REALLY fun!
Wednesday, July 20, 2011
CTMH Color Dare
I took the dare! This week while looking through the posts about the CTMH Convention I found a new page that is dedicated to a CTMH color dare! I thought, 'what a great way to use up some of my stash!!' So, this week I took the challenge!
The colors this week are:
Chocolate
Pear
Twilight
Goldrush

What fun!! And while I did this one I used the same basic base as below and actually took pics of my button carnation construction!!!! So, now you will know how to create the button carnation.... love this one!
For this card I used: Goldrush, Chocolate, Pear and Twilght card stock; Silhouette 3-d 6 Petal Flower and Leaf Pop-Up; Twilght Gross Grain Ribbon (discountinued), Chocolate Brown Slide (this is on clearance now it is discontinued), Goldrush, Chocolate, Pear and Twilight Exclusive Ink Pads, round sponge (do not foget to cut it up and use paper clips to hold it - so, you do not color your fingers), Card Chatter - Birthday My Acrylix Stamp Set, for adhesives I used a glue pen, TomBow and Liquid Glass and a Colonial White Card Base
To put this one together I cut everything out and inked the edges of it all. The basically it was just attaching it all together. To make that center Carnation flower... I will post those directions (with pics - if you do not need the pics see the last posting) later tonight or tomorrow!!!
Monday, July 18, 2011
Cards
Today I made a few cards I thought I would share with you....
All of them are on a 4.25 X 5.5" base card... from Close to My Heart (50 cards and envelopes) in white or colonial white.

 For this one I used the white base card. White card stock, Ponderosa Pine card stock, Smokey Plum card stock, Smokey Plum Ink, the stamps Card Chatter: Sympathy and a retired one for birthdays, Liquid Glass for an adhesive, Tombow adhesive, Bonding Memories Glue Pen, 1 1/4" Circle Punch and my Sizzix Texture Boutique with a flourish background for texture on the white card stock paper. To make this I cut a large and two small 6-leafed flowers with my Silhouette - you could hand cut these - then I inked around the outside with the Smokey Plum ink. To make the centers I cut a 1" X 10" strip and 2 - 3/4" by 9" strips. I ran a small line of the Towbow adhesive down the inside of one of the 10" or 9" sides and then looped the other side over to adhere it - note I did not bone fold it, but just attached them together which made it a small loop. The holding the glued side I cut 1/8" strips in it being careful not to cut it through. Beginning at one end I rolled it together (like quilling) using the Bonding Memories Glue Pen to adhere it... leaving the loopy, cut end at the top... glue at the bottom. After I had rolled each of these I used Liquid Glass to adhere it to the 6-leafed flower. When this dried I spread the looped ends out. I then cut the leaves with the 1 1/4" Circle Punch out of the Ponderosa Pine Card Stock... to do this I punched the circle first then reinserted 1/2 of the circle into the punch 2 times which leaves an hourglass looking piece left over.... and 2 leaves from each 1/2 of the original circle. I cut out a piece of the Smokey Plum Card Stock 1/4 inch smaller than the base card (4 X 5 1/4) and adhered it to the basecard for the Birthday card and cut out a 4 X 4 piece for the Sympathy card. I then ran a piece of white card stock through the texturizer and cut it out 3 3/4" X 5 for the Birthday card and 3 3/4" X 3 3/4" for the Sympathy Card and attached them to the Smokey Plum. I stamped the images on the bottom of the cards using the Smokey Plum Ink and stamped a sentiment in the inside of each. Using the Liquid Glass I attached the flowers and the leaves. I am sure these directions are as clear as mud... if you have questions e-mail me.


The good news is this is made exactly the same as the blue ones except I used different colors... and used the Card Chatters Sympathy stamp set. The paper I used was just left overs... the trim border is the Kraft Color Ready Border colored with black ink on the bottom card and Holiday Red Ink on the top. For this card I embossed the sentiment using black embossing power, Versa Mark Ink and the Craft Heater. E-mail for further instructions as needed...
Next time, I will try and remember to take pics during construction so you can see the process....
All of them are on a 4.25 X 5.5" base card... from Close to My Heart (50 cards and envelopes) in white or colonial white.

Directions for each one follows....


To make the blue card... much easier. I used.... the Colonial White card base, Magnifique Level 2 paper packet (hurry this is NOT in the new cattie), Chocolate brown ink, Card Chatter: Birthday My Acrylix Stamp Set, Kraft Color Ready Borders , TomBow Adhesive, Liquid Glass Adhesive, and 2 large and 4 mini blue brads. To make this card I cut out a 2" X 3 1/4" piece of the Magnifique striped paper and a 3 1/4" X 3 3/4"piece of the Pacificia Card Stock paper and attached it to the colonial white base so the card opens from the bottom. I then attached the Kraft Color Ready Border as is - no new color added. I cut out 1 large 2 1/2" 8-leafed flower, 3- 1 3/4" medium 8-leafed flowers, 2 - 1" small 8 leafed flowers, 1- 3/4" 5 leafed flower and 2- 1/2" 5 -leafed flowers with my Silhouette from each of the Lagoon colored pattern paper and the brown colored pattern paper... you could cut these by hand. I then cut 1/8" strips in all of the 8 leafed flowers petals. I attached the flowers together alternating patterns ( 3 flowers per flower - 2 of the 8 leafed and 1 of the five leafed) with the 5 leafed flower going beneath the brad on each flower. I used the Lagoon card stock to make the leaves. I attached the flowers using the Liquid Glass. Once again this is as clear as mud... so, e-mail me for further instructions as you need them.

The good news is this is made exactly the same as the blue ones except I used different colors... and used the Card Chatters Sympathy stamp set. The paper I used was just left overs... the trim border is the Kraft Color Ready Border colored with black ink on the bottom card and Holiday Red Ink on the top. For this card I embossed the sentiment using black embossing power, Versa Mark Ink and the Craft Heater. E-mail for further instructions as needed...
Next time, I will try and remember to take pics during construction so you can see the process....
Wednesday, June 29, 2011
more with you&me!!!
Okay... finished 6 cards - not my best - but, ones I did with the left-overs from the You & Me kit! I just used one extra 12X12 sheet in an off white color! One of these is going in the mail today :)

Saturday, June 25, 2011
My You & Me Layouts....
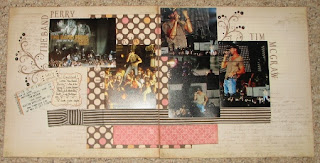
Today I am posting the two double page layouts I created with the "You & Me Together" kit. I used the layouts that were suggested (this time .... have another kit that I am planning on recreating) but, I did not use all of the picture sizes they suggested (I used a 5X7 instead of a 6X6 on the Florida page). Here are my takes... I just snapped these on the floor next to the pool table I scrap on :) so, the photos are not the best but you can see the idea (it is raining outside - again! and I do not want to get these wet).
This one is memories from a recent trip to Destin....

This one is memories from a recent trip to Destin....

And this one is from the Tim McGraw concert ....

You need to hurry and get this kit.... it is EXCELLENT!! You will love it! Has all you need to do both of these and I have some left overs I will be using to make some great cards... or maybe a couple more single page layouts???? Anyway HURRY and get yours today! And do not forget that a portion of the proceeds will be donated to the Red Cross Spring 2011 Floods and Tornadoes relief operations!
Wednesday, June 8, 2011
New Promotions
Hey, I know it has once again been forever and there is not an excuse! But this month we have TWO excellent deals.... the first one is with our StudioJ... so, all of you who love to do digi projects this one is for you!!!

EVERYONE gets a FREE StudioJ JPG file - no purchase is required!!! Simply log on to Studio J, create a layout, then order one JPG file of your layout! It's as easy as that! Download and save your file so you can post your layout online, email it to family and friends, or print them!! If you have a Studio J account, just log in and start creating. If you do not have an account, creating one is EASY! (Even I did it without Kyle's help!!). You can access StudioJ by clicking on the words and that will take you right to my site!!! With this you can discover for yourslef how quick and simple scrapbooking can be with StudioJ - and get your FREE JPG ;ayout in Free-For-All JUNE!!!!
The second special offer is for those of you who prefer traditional scrapbooking (like me) :) - I love the ease of Studio J but nothing beats a traditional layout to me! JMHO

Okay now for more exciting stuff!!! Here are two video "how-to's" on Studio J
These two videos are EXCELLENT!!! If you want to learn more about Studio J!!!
Okay, so now I am going to go to work and make a few cute layouts with my You & Me kit.... I will be posting them soon (not sure if I will be using the layouts in the kit or doing my own - wait and see- if I use another I will be sure to let you know how to :)) Talk soon! Kathy
Saturday, April 2, 2011
Overwhelmed!!! BUT WOW!!! CHECK THIS OUT!!!
HI all!! Yes it has been terribly long since I have posted. School has me a bit overwhelmed right now, which is sad to say... but, true. Anyway, I wanted to share an exciting video with you about National Scrapbook Month! And to tell you about our fabulous promotion for April!
First here is the video description and link :)
Explore Close To My Heart's new You & Me scrapbooking kit, designed exclusively for National Scrapbooking Month in May 2011. You'll create two unique, fully embellished two-page layouts using the cardstock, B&T Duos® papers, ribbon, D-size stamp set, accessories, and step-by-step instruction guide that are included in the kit. Grab the kit at a great discount with a qualifying purchase, for free when you join Close To My Heart, or at full retail—the choice is yours! Take a look and you'll be hooked!
THIS MONTH!!!
During April, when you place an order of $100 US / $115 CAN or more on my MyCTMH® website, you’ll receive one My Reflections® Level 1 kit of your choice FREE during our Lovin’ Level 1 campaign. Choose from several popular Level 1 kits. You’ll also qualify for a free April Stamp of the Month set! Now that’s a deal.
Also, another great deal for those of you who use Studio J....
This April, it’s time to let your Studio J® layouts shine with this exclusive, members-only campaign! Studio J members get free bling when they buy 10 layouts this month. Bling it up and bling it on with FREE self-adhesive Sparkles and Opaques Pearl gems!
Wow!! So much great stuff to share!! I can't wait to play!!!
Have a great month!
Kathy
Tuesday, February 1, 2011
WOW!!! Lots going on this month!!!
This month's THE MONTH!!!! It is a great time to join as a consultant!!! and a great time to join as a Studio J Member and OUR NEW IDEA BOOK is out!!!! Wow! What a MONTH!!! Plus this month's stamp set is awesome!!! So what ever your desires this month is the month to make it happen!!!!
February is Free, Free, and Fabulous!!!
When a new Consultant joins Close To My Heart during February and achieves Straight To The Top (both levels; first month and the first three months), they will receive Straight To The Top rewards of $100 US / $110 CAN in select product credit, PLUS they'll receive a rebate of $129/$140 on their New Consultant Kit. It's free products and a free kit—a fabulous deal! E-mail me if you are interested!!!
A Perfect 10 for Studio J®
Buy 9, Get 1 Free (3 Month and 12 Month Members Only)
February is free layout month for Studio J® members! For every 9 custom-printed Studio J layouts you buy, you’ll receive the 10th layout free. To receive the discount, just add 10 or more layouts to your cart. You’ll see a discount reflected in your order total. And you can totally take advantage of this promotion by ordering in multiples of 10. Buy 9, get 1 free. Buy 18, get 2 free. Buy 27, get 3 free. And so on! If you’re not a member yet, now’s a great time to join!
New Idea BOOK!!!!
If you would like a new Idea Book contact me!!! OR YOU CAN SEE IT ON LINE NOW!!!! Just click here... and you will be redirected to my CTMH site!!! IT has some awesome new products! You will love the new papers (of course they are really awesome!) But my new favorite it the new SPRAY PEN!! It is REALLY fun! If you like Tattered Angel products you will LOVE this new pen!!! And I will show you how to use it!!!! I love the new Workshop On The Go Kits.... they explain how to make the pages or cards in detail!!! You wouldn't even need me to get you started.... or we can plan an afternoon of fun and do one together!!!
February Stamp of the Month!
Here it is the latest SotM... I did not do the blog hop this month .... but, you can start your hop here....

Thursday, January 20, 2011
Rainbow Falls

Monday, January 17, 2011
Olivia Pages and Flip Flaps! PLUS cruise pictures!!!!!
These are a few pages I made right before Christmas...with the Olivia Workshop Kit! Great stamp set and beautiful papers!!! Love those shimmery brads!! yes, it took a while to post them.... but check out S'mores! I used flip flaps to make this page! You can see the page closed (picture 1) and then with the flip flap open (picture 2)! These are SO much fun to use!! What a great way to add pictures to your layouts.


Here is the other page I finished! This is the layout you have the pattern to with the Olivia Workshop Kit!! This was quick and fun!
 Now the pictures from the cruise so far!!! Here is my cover page for my scrapbook - I have not purchased the scrapbook to put these in yet - it is on my wish list from CTMH!!
 This is made with Rusted Sun Petals in the Sand paper, assorted cardstocks and cut-outs from my Silhouette.
The next three 2 page layouts are when we wer on the plane and getting on the boat!


 So far this is my most unfavorite page - I know I shouldn't asy that but I am thinking it will need reworking when I have the inspirtation! I made it with Fancy Pants Paper - About a Girl. Just not real thrilled with it.
 Our first days were in Maui - see the clouds - yes, they were with us the whole time PLUS a lot of rain and not just those tropical showers.... but we still had fun! Yellow cardstock with Rusted Sun papers - Umbrella, Indian Summer and Petals in the Sand...the letters were cut with my Silhouette.
 The first full night of the cruise we had a mini-non-anniversaryAnniversary Dinner for my parents....
 The last one I have completed, so far... is from Hilo. We took a tour of a few places at Hilo, Hawaii - the big island - volcano side... these were from a garden... Lili'uokalani Gardens which were dedicated in 1917 to the memory of Queen Lili'uokalani... it was/is breath-taking...even in the rain! For this I used CTMH paper - Unfortgetable and the flowers are stamps made with C1340Aspiration Stamp set and Exclusive Inks - Blush and Sorbet - then I knew it needed a little bling so today I ran to Archivers and got the glitzy square stickers- Crystal Stickers Mosaic.
Okay more to come when I get them completed!!! Have some pictures already printed just not scrapped yet!!


Here is the other page I finished! This is the layout you have the pattern to with the Olivia Workshop Kit!! This was quick and fun!

The next three 2 page layouts are when we wer on the plane and getting on the boat!

Navy cardstock with BoBunny Paradise Surf paper and cut-outs from Silhouette.

These pictures were taken when we got to the boat. Orange cardstock with Basic Grey Color Me Silly papers and letters.


well that is the reason we were on the cruise in the first place! Kassidy sat between them and was VERY embarrased when they sang to them with her in the center!! This paper is from BoBunny Paradise.

We were on Maui two days... these are from the second day when we went to Lahaina. Baby Blue cardstock with Rusted Sun papers - BeachBall and Indian Summer.

Okay more to come when I get them completed!!! Have some pictures already printed just not scrapped yet!!
Studio J
I got my Studio J layouts back from CTMH and I love them! (But, I do still prefer to use paper.) Here are my layouts.... Belle actually fell asleep in the pie plate. Dale let her have scraps .... what can I say??


the one on the left is from November and Jessica's 24th birthday. The one on the right is pictures from my Daylillies... I just love these bright sunny flowers!
I am going to try and get pictures taken of all of my Hawaii layouts I have completed so far AND a couple I did right before we left - one that uses flip flaps - I am telling you - these are a cool way to add a large number of pictures to one layout page!! If you want to learn more about them just ask me and I will help you learn!!! Fun! Fun! Fun!

And for the other one I made a double page spread into two seperate pages (here they are together.)

the one on the left is from November and Jessica's 24th birthday. The one on the right is pictures from my Daylillies... I just love these bright sunny flowers!
I am going to try and get pictures taken of all of my Hawaii layouts I have completed so far AND a couple I did right before we left - one that uses flip flaps - I am telling you - these are a cool way to add a large number of pictures to one layout page!! If you want to learn more about them just ask me and I will help you learn!!! Fun! Fun! Fun!
Saturday, January 1, 2011
January Stamp of the Month

Hi!! This month I did not participate in the Stamp of the Month Blog Hop, because of time constraints... packing and repacking and repacking again (still packed WAY too much!!) and traveling to Hawaii took a toll on my free time this month! But, now that I am back I plan to not only use the stamp of the month but have HUNDREDS of pics to make into great layouts! (All of which I plan to post!! I will be using many products, not just Close to My Heart products to complete my Hawaii album!!) I am going to post a link to the beginning of the Stamp of the Month Blog hop for my many friends and customers who like to look at the creative takes on the use to our newest stamp set! Here is the link to Helen's web page... where you can visit the list of participants and begin the blog hop this month!! January Blog Hop As soon as I have completed some of Hawaii I will be posting them here!!
Subscribe to:
Posts (Atom)