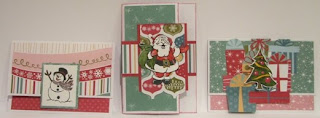
Using the new 12 stamp collection you can easily creat a multitude of designs to help with your Christmas Holiday needs...
I have worked on cards, but with this set you could make tags for gifts and even homemade gift wrapping paper! There are even To and From stamps on the sheet!!! I am thinking my next creation for this will be gift card tags to give to my neices and nephews!! I will post those when they are finished!
If you do not want to see my directions you can hop on over to Doreen's Blog now and continue on....
Materials Used:
Jingle Level 2 Paper Packet (X7115B)
White Card Stock (1385)
Euro Personal Paper Trimmer (Z338)
TomBow Mono Adhesive (1514)
Micro Tip Scissors (Z534)
StazOn Ink: Black (Z888)
Exclusive Inks Markers: Tulip (Z2366), Juniper (Z2365), Olive (Z23237), Creme Brulee (Z2367), Chocolate (Z2311), Brown Bag (Z2308)
Exclusive Color Ink Pad: Daisy White (Z2163), Tulip (Z2166)
Watercolor Pencils (3505)
Acrylix Bocks: 1 X 1 1/2" (Y1001), 2" X 2" (Y1003), 3" X 3" (Y1006)
Blending Pen (3174)
3-D Foam Tape (Z1151)
For all of the cards I used a 4.25 X 6.25" Daisy White cardstock base card. (When I cut these out, I cut out many, so I have them available to make a quick card any time.) I cut 1" off of one of the 4.25 sides using my Euro Personal Paper Trimmer to make it 3.25". I stamped the images on left over Daisy White Card Stock using StazOn Ink and colored them with the Exclusive Ink Markers using the Blending Pen to blend. (For the black I used the Watercolor Pencils so my black would be a bit softer.) For the Santa and the Tree I used my Micro-Tip Scissors to trim around the edges of the stamped image.
Card 1 - Snowman - (This is my personal favorite!)
To make this I cut the wave lined paper 3" X 5.78" and attached it to the short part of the front with my TomBow Adhesive. I then cut the red dotted piece 2" X 5.78" and attached it to the long part of the front. After coloring in the snowman image I cut the surrounding paper 2" X 2 1/2"and attached it to a piece of Juniper Cardstock which I had stamped randomly with the star/snowflake stamp using Daisy White Ink and a 1" X 1" Acrylix Bock. I then attached it to the front of the card with the bottom 1/2" hanging below the top piece.
Card 2 - Santa
To make this I turned the base card paper vertically. I used the juniper cardstock, cut to 3" X 5.78", and randomly stamped the star/snowflake image in Daisy White Ink. I then attached it to the card using the TomBow Adhesive. I cut a piece of the ornament paper 2.5" X 4.5" and trimmed the bottom of the ornaments out. I attached this to a piece of 2.75" X 3.75" Tulip cardstock matching the top edges and allowing the bottoms of the ornaments to hang over the end of the Tulip paper. I cut a piece of the stripe paper 1.6" X 7.5" and attached it to a piece of 2" X 7.5" Tulip cardstock. I cut this in two with one piece being 3.1" long and the other the remainer and trimmed both to match the two card fronts. (I hope you are understanding this - if not e-mail me and I will try to explain it better :)) I attached the already prepared Santa to the front of the ornament piece and then attached this piece over the stripe paper and Juniper cardstock leaving 1/2" overhang. This piece I distressed using Tulip ink - and now I think it almost looked better not distressed.... JMHO
Card 3 - Tree
For this card I used the base hoizontally. The star/snowflake paper, cut to 3" X 5.78", was attached to the top of the front and the reverse side, cute 2" X 5.78", was used for the bottom. I cut out packages from the package paper making it approximately 4.5" X 4" and attaching it to the juniper star/snowfake paper front. I then attached the already prepared tree using 3-D Foam-Tape. (Now I wish I would have popped the other stamped images out as well... next time...)
Now Hop on over to Doreen's Blog to see her great work!!!


